
Advanced Git#
In the first session on Git, you learned how to put a project under version control, and how to commit and undo changes. For small solo projects this is often all you need to do. For larger more complicated projects, one needs to be able to support parallel lines of development, whereby one or multiple people can work on different versions of the code, and be able to later merge these. Git was specifically designed to cater for this need which it does via branching and merging. In this tutorial you will learn how to branch and merge for both individual and collaborative projects.
The material of this tutorial is based on Chapter 3 of the Pro Git book. We in particular make use of many of the diagrams and examples used there. The chapter goes into much detail than we do here and you are strongly to read it in full.
Local Branching#
In this section we show how you can use branching on a local repository on your own computer. These commands are useful for individual as well as collaborative projects.
Git Commits, HEAD and Branches#
Commit checksum#
A commit itself is uniquely identified through a checksum (based on the SHA-1 hash) which is 40-character string of hexadecimal characters (0-9 and a-f). A commit checksum looks something like the following:
24b9da6552252987aa493b52f8696cd6d3b00373
You can see the ID for a commit, for example, by running git log.
These commit checksums are used internally by git to reference different commits, and can also be used by users to identify commits.
It is common to use a shortened version of the checksum (a short hash) consisting of the first 7 characters of the full checksum.
For example, the above checksum could be abbrieviated to 24b9da6 and then used with a git command such as git checkout 24b9da6.
We will discuss the git checkout command more below.
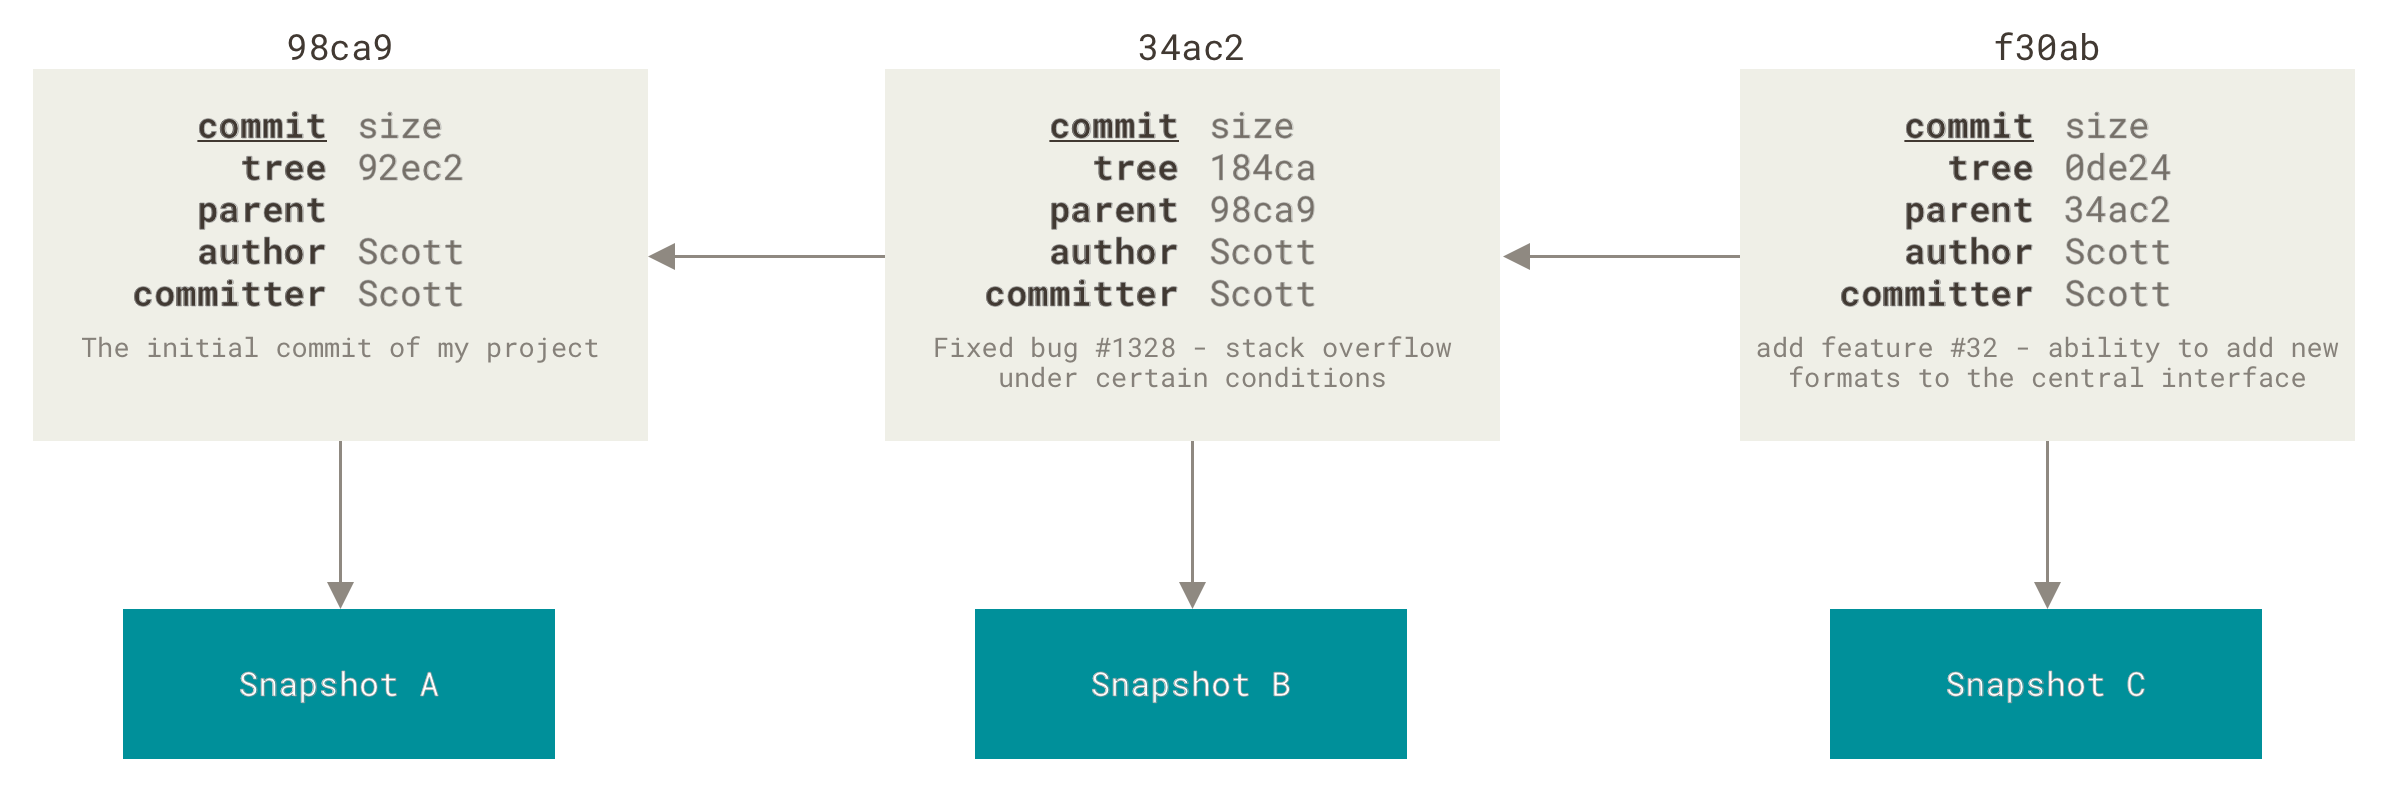
Commit network#
The checksum of a commit is calculated from its elements. These consist of the following:
snapshot (tree): the files and directory structure of your project (to be more precise the commit contains a reference to the snapshot, rather than the snapshot itself)
commit metadata: the author, commit log and other metadata related to the commit
parent: this is a reference (the commit checksum) to the previous commit. There is usually one parent, but in the case of the initial commit, there are no parents. In the case where the commit results from merging multiple other commits, then there can be multiple parents.
The commit history of a Git repository can be viewed as a network, where commits correspond to nodes in a network, and arcs go from commits and their parents. The following diagram shows a example of a commit history with three commits.
Branches and HEAD#
A branch in essence is a pointer (reference) to a commit.
When you make your first commit in a repository, a branch with the name master (or main depending on how git is configured) is created.
Every time you make a new commit, the pointer to the master branch will automatically be moved forward.
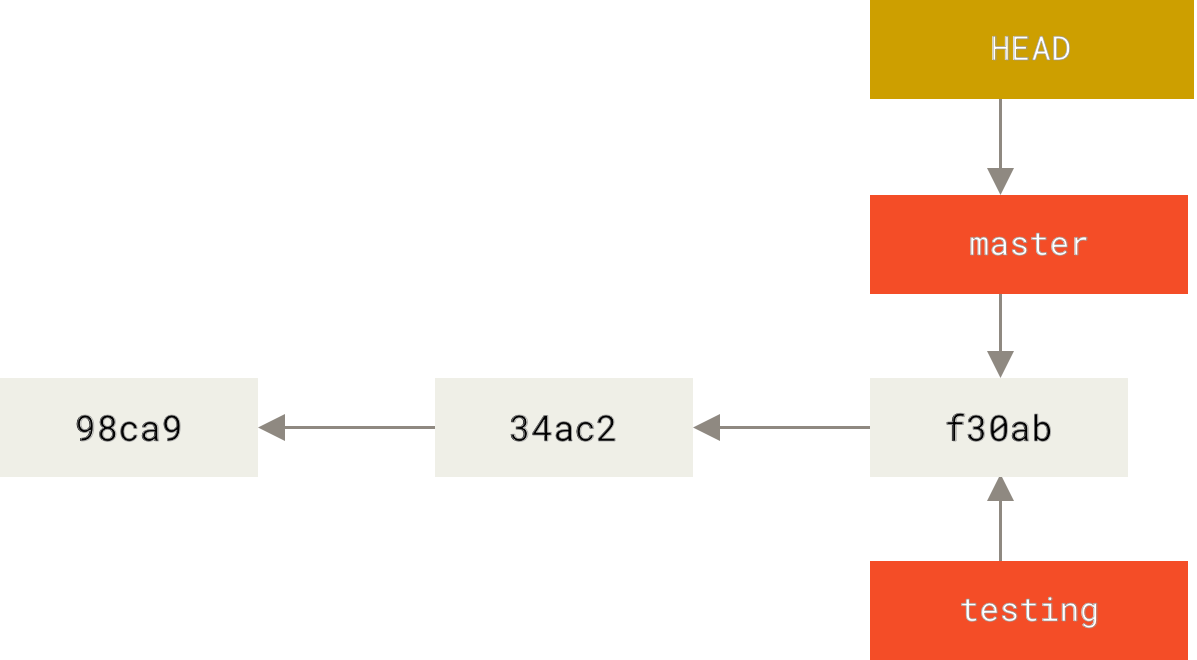
To create a new branch, we can use the git branch command:
git branch testing
This creates a new branch pointing to the same commit you’re currently on.
When we have multiple branches, how does git know which branch you are on?
This is kept track of with a special pointer called HEAD.
When we create a new branch, we do not automatically move to it.
Thus, after we create the new branch, the HEAD is still pointing to the master branch as illustrated below.
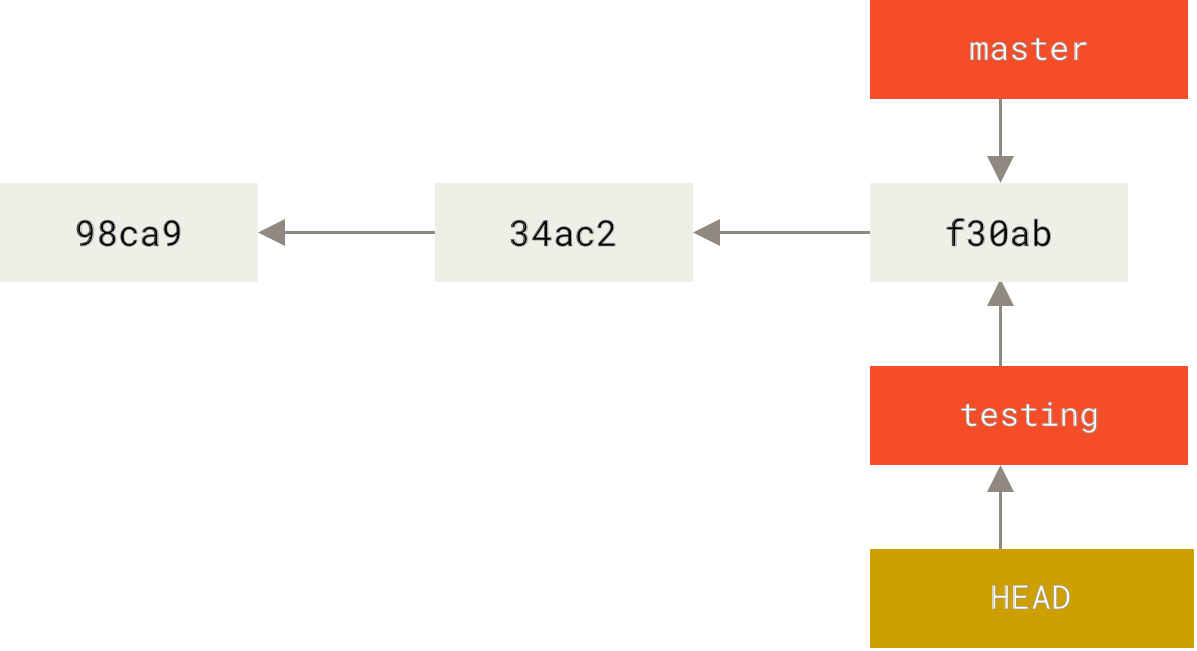
To change to the new branch we can use the git checkout command:
git checkout testing
This moves HEAD to the testing branch as illustrated below:
Besides switching branches the git checkout command has many other uses, such as restoring individual versions of files.
To avoid confusion, a dedicated command for changing branches git switch has been added to recent versions of git:
git switch testing
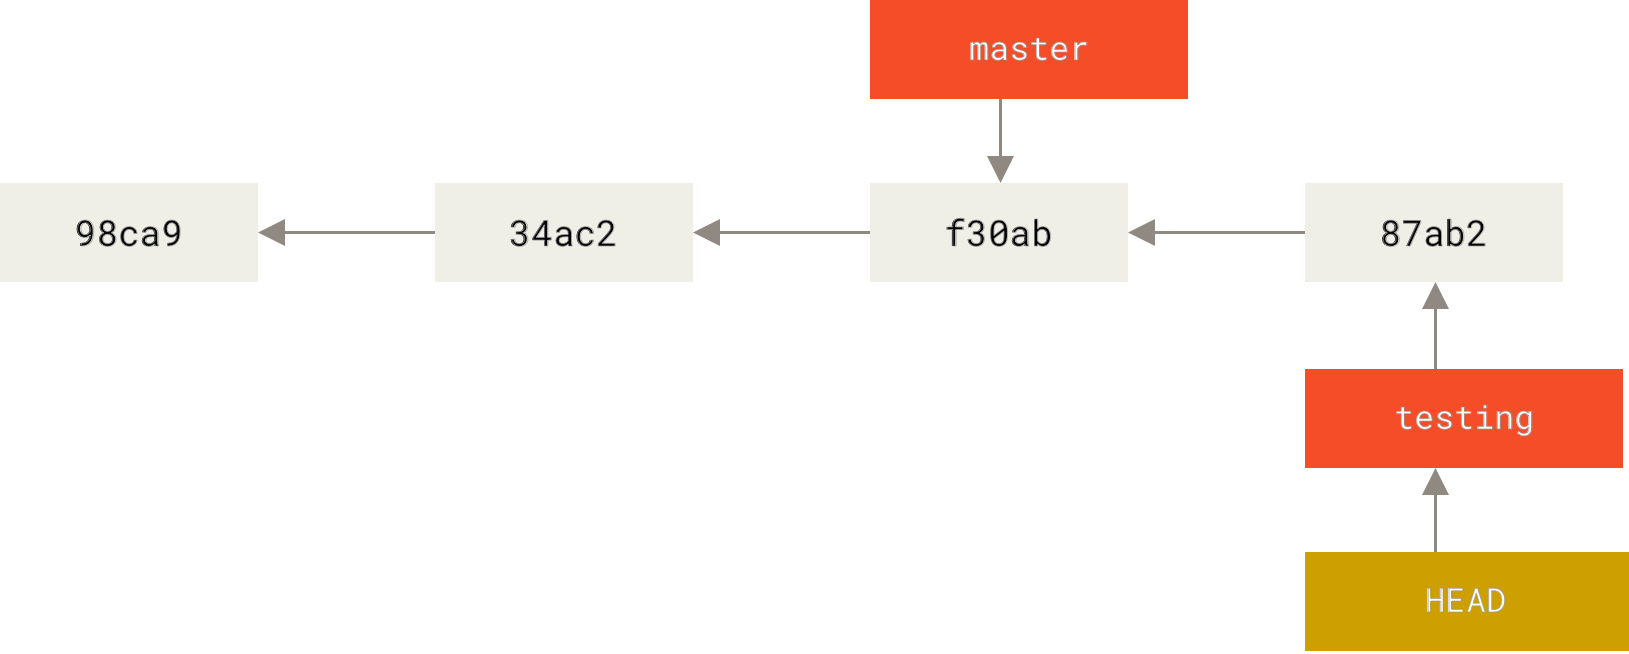
What happens if we now make a commit on the new testing branch?
This will create a new commit a new commit to which the testing branch and HEAD will now point.
However, the master branch will still be pointing to the previous commit.
This is illustrated below.
We can move back to the master branch in the same way, using git checkout or git switch:
git switch master
This will cause HEAD to point at master.
If we make a new commit on master, then the master branch and HEAD will move forward to the new commit, but the testing branch will remain unaffected.
At this point, the commit histories of the two branches will have diverged as illustrated below:

This is a situation which commonly arises when using git.
We may be using the testing branch to develop and test some new feature in our code base.
We use a new branch to do this, so that we still have a working set of code on the master branch.
However, at the same time, we may need to do work on the master branch of the code, for example fixing small bugs.
If the new feature on testing is successfully developed, then we will want to incorporate the changes we make here back on to the master branch.
To do this we will need to merge the two branches.
Local Merge#
For this tutorial you will work individually on your own Git repositories. The aim is to familiarise yourself with basic branching and merging.
More details on simple merging can be found here.
For this exercise you should use an existing git repository on your machine.
For example, you could use the repository you created for assignment 2.
Make sure you begin with a clean repository.
That is, there should be no files under version control which have uncommitted changes.
Recall that you can check this with git status.
We assume here that the default branch is called main.
If this is not the case, then change this to master as appropriate.
Branch and fast-forward merge#
You will first practice creating, switching and merging branches in a simple case where merge can be completed with fast-forward. Although this is the simplest scenario when using branches, it still often occurs in practice, when working on individual projects.
Create a new branch called
testingwithgit branch testingVerify your branch has been created using
git branch -v. This should show that there are two branches (assuming you haven’t created any others previously) pointing to the same commit, and that you are still on themainbranch (indicated by an asterix).Change the branch to
testingusinggit switch testing. Rungit branch -vagain to verify you are now on thetestingbranch.Make some changes to your code and create new commit. For example, you could add a few comments to your README.md file. Recall you can stage changes to a file with
git addand then commit them withgit commit -mfollowed by a log message. Thegit branch -vcommand will now show that thetestingbranch is on a different commit tomain.Switch back to the
mainbranch withgit switch main. Note if you don’t have a clean repositorygitmight complain if you try to change branches. Verify the changes you just committed ontestingare not present onmain. Rungit log --oneline --decorate --graph --all. This will print a more graphical overview of the commits on your different branches.Merge the changes from
testinginto themainbranch by runninggit merge testing. Because the latest commit ontestingis directly ahead ofmain, we can do a fast-forward merge which requires no further intervention from us. Verify the changes you committed are now present.Running
git branch -vwill show thatmainandtestingare now pointing at the same commit. You can now delete thetestingbranch withgit branch -d testing.
If time allows, repeat this exercise with another branch (of a different name) and some more change where you make multiple commits to the new branch.
Branch and merge with conflicts#
Now that you have some experience with branches, we will now handle a more complicated situation. In the following exercise you will branch in such a way to create that you create a resolve a merge conflict. We will provide fewer instructions with regards to creating and checking out branches, assuming you are now more comfortable with this.
Create and checkout a new branch called
testmerge(or whatever you like).Make some changes on this branch and commit these.
Check out your
mainbranch again. Make and commit some more changes here. In particular, some of these changes should affect the sames lines of files you modified on thetestmergebranch. For example, if you change the names of variables in a function on one branch, and add type hints to the same variables on another branch, you would be modifying the same lines.Merge the changes from
testmergeinto themainbranch withgit merge testmerge. This will automatically merge changes to different parts of files, but will also create merge conflicts where in parts of files where changes have been on both branches.Manual fix the the merge conflicts by opening up the affected files in an editor. Running
git diffhere may be useful for finding where these are. Recall that merge conflicts are indicated with sections marked up with sections which resemble the following:
<<<<<<< HEAD:main.py
def circle_area(r: float):
   """Calculates the area of a circle for a given radius"""
=======
def circle_area(radius):
>>>>>>> testmerge:main.py
To merge simply select which version of the code you want to keep, and delete the other version.
Alternatively, you may need to create a snipped of code which incorporates elements from both versions of the code.
In either case, when you are done, there should be only one version of the conflict in the code, and you should delete the lines <<<<<< ======= and >>>>>>> which indicated the conflict.
Run
git addfor each file which had merge conflicts, and commit the changes. The two branches have now been merged.
Working with Remote Repositories and Branches#
So far you have only used git for your own individual projects.
git is designed to easily allow collaboration.
What makes this possible is the use of remote repositories.
A remote repository is essentially just a repository hosted on the internet (like on GitHub) or a computer network somewhere which multiple users have access to.
Remote repositories#
Whenever you clone a repository, a remote repository called origin is associated with your local repository.
You can both pull changes from a repository (perhaps made by others), and push your own changes to a remote repository so that others can use them.
It is possible to have multiple remote repositories associated with a local repository.
To display the remote repositories associated with your project, you can use the git remote command:
git remote -v
If a repository has been created locally using git init (rather than being cloned) it may not have a remote repository associated with it.
To add a remote we can use the git remote add command like as follows:
git remote add origin https://github.com/paulboone/ticgit
The command above would add a remote called origin with the URL that follows.
Remote-tracking branches#
A local repository keeps track of the state of a remote repository through remote-tracking branches.
These are branches in your local repository which you can’t modify directly, but which are updated whenever you fetch changes from a remote repository.
The names of remote-tracking branches take the form <remote>/<branch>, for example origin/main.
You can view the remote-tracking branches by running the following command:
git branch --all
When you clone a repository, the remote-tracking branches are automatically set-up for you. The following diagram illustrates this:

If you were now to make some commits to master, the remote-tracking branch would now be behind.
Simultaneously, someone else might push some other changes to the remote.

To update your remote-tracking branches you can run the command git fetch <remote>.
If you just run git fetch, this will by default update the remote-tracking branches for origin.
Suppose that after running git fetch, some commits made by a collaborate are found to have been made.
The situation would then resemble the following:

In this case, we can see that origin/master and master have diverged.
If we want to incorporate changes from origin/master into master we would have to use a merge:
git merge origin/master
For this common situation, git allows the following short-hand:
git merge
Since fetching and merging is such a common operation with version control, git provides a single command for doing this:
git pull
Optionally, when using git pull you can specify a remote and a branch to pull from. For example git pull origin main.
Pushing to a remote#
To put your changes onto a remote repository for others to you use, you can use the git push command:
git push
By default, this will push changes made to the current branch to origin.
You can also specify a remote and branch to push to:
git push origin testbranch
This would push the branch testbranch to the remote origin.
If the branch testbranch doesn’t already exist on the repository, it will be created.
Note that if you are missing commits from a remote, you will have to merge these into your repository before you can push your own changes.
Checking out a tracking branch#
When you use git push and git pull without further arguments, they will work if the branch you are working on has been set up as a tracking branch.
A tracking branch is a branch which has direct relationship with a remote-branch.
For example, when you clone a repository, the master (or main) branch is automatically configured to track origin/master.
Suppose now that a collaborator has created and pushed a new branch to your shared remote repository.
If you wish to use and change this, you will need to checkout this branch as a tracking branch.
To do this you can run a command git checkout --track <remote>/<branch> after running git fetch.
For example, if you the branch were on origin and was called serverfix you would run:
git checkout --track origin/serverfix
This is such a common operation, that in recent versions of git you could simply run the following:
git checkout serverfix
This works as long as you don’t already have a branch of the same name, and don’t have multiple remotes with a branch of that name.
To view which branches are tracking branches, and their current status, you can run:
git branch -vv
Collaborative Exercises#
In these exercises, you will work in your groups to practice using Git in a collaborative way. For these exercises, one of you should set up a repository up on GitHub and invite the other group members as collaborators. See here for more information.
Sequential Committing and Pushing#
Take it in turns to each update the remote repository. In particular each person should do the following:
Run
git pullto get the latest changesMake some changes and commit them to your local repository
Push the changes to the remote repository with
git push
You should see that working in a strictly sequential manner like this, means that no merging is required.
This is why you should always run git pull before you start working.
Collaboration with Merging#
Often when working collaboratively you cannot commit and push code in such a sequential way and need to work on it simultaneously. This will necessitate merging each others changes before you can push your own to a remote repository.
In this exercise, starting at the same commit, each member of your group should make and commit such changes simultaneously to their own local repositories. Try to make these changes overlap somewhat (i.e. affect the same lines in files) so that you create merge conflicts.
After you have made your commits, each member should then pull changes from the repository (with git pull) and then push their own changes there.
The first member to do this will be able to push directly, but the following members will have to merge the changes from the preceding commits before pushing their own.
Repeat this exercise so that every member of your group has at least to do a merge.
Workflows for collaborative work#
In the preceding exercises, you were probably just working on your main branch.
In your project, you may want to use feature branches as well.
One way to use branches with remotes would be to just use your own branches locally, and then merge these with the tracking main branch, before pushing this latter to your remote repository.
More complex workflows are possible. It is recommended that you read the following about other possibilities: https://git-scm.com/book/en/v2/Git-Branching-Branching-Workflows.